

Your Guide

Mose Hayward
Efficient Vagabond
I’ve been working with dual monitors while wandering the world for decades. I’ve tried many setups and scraped together wisdom from other digital nomads I meet in coworking spaces, cafés, and Reddit forums.
In this post I’ll share my budget multi-monitor working travel setup. I’ve also got a few alternate recommendations to help you evaluate your options for staying both portable and productive without spending too much.
More recently, I’ve moved to a somewhat pricier travel monitor that comes with its own tripod: the Tern Setups monitor + stand. With that option, I put the second screen at eye height and can keep the laptop on the table. It costs more but it’s super comfy to travel and work with; find out more in my Tern Setups review.
The Nomadic Multi-Monitor Setup
Here’s how my setup looks. It can go anywhere and gives me a lot of screen real estate to work with, so I can have various documents and research sources open at once.

Notes:
- I’ve optimized for portability, rather than for having huge screens. Still, this is a pretty good total chunk of screen real estate.
- The monitor’s protective case can double as a mouse pad if the table surface is glass, funky metal grating like in the picture, or otherwise not conducive to an optical mouse. It’s surprising how many tables I wind up at where this is necessary.
- iPads work seamlessly as secondary monitors (though they’re a bit small). One often has an iPad on the road in any case to watch movies or series (using a travel VPN to connect) or to read books/learn languages in the Kindle app. An iPad is thus a great multipurpose travel/work tool.
- I think that a folding laptop stand and separate keyboard is essential so that your main screen is at eye height and your hands rest comfortably on the tabletop. Some disagree, and can forgo this. But those hardy souls will have cricks in their neck from looking down all the time, eventually.
- Ensuring that everything connects via USB-C simplifies the number of charging adapters you need to carry.
- This setup is not at all expensive. Take away the iPad and replace the Mac with a Chromebook (which I used for years, and loved too) and the entire setup could cost less than US$500.
And what if you want to stand up while you’re working? I also did, for a time. And I threw together a setup for a portable, multi-monitor standing desk and used it as a nomad for years, but stopped doing this once I became a more active gym-goer; the heavy squats obviated my desire to work standing up.
The Breakdown and Transport
Here’s how this all folds down to a stack that is just a couple of inches thick.

Specific Gear Recommendations
Portable Second Monitors
All sorts of monitors are available at both cheap and outrageous price points. Whatever you choose, there are a couple of very simple practical considerations:
- You need a built-in stand; some second screens have a cover that folds into a stand. Mine has a kickstand built into the back that folds out and works great both horizontally and vertically. Vertical is excellent when referencing longer documents in your work.
- Portable monitors that do not include a protective sleeve or case of some sort will quickly get damaged in travels. Be sure to get one with a compatible case!
The widely recommended Arzopa model that I’m using meets all of these requirements and is brilliant, sharp, and compatible with pretty much any modern laptop. It’s hard to beat the quality/price ratio.

Due to the manufacturer’s moral failings, the Arzopa does not come with its own cable. If you’re using USB-C, you need to make sure you have not just any USB-C cable but rather a USB-C VIDEO cable like this one.
Want your second screen at eye level too? The Arzopa stands on its kickstand at table height. If you’d rather have it up beside your raised laptop, the Tern Setups Monitor + Stand does that on a light tripod, for considerably more money. Here is my Tern review after nine months of daily use.
Using an iPad as a Second (or Third) Screen
On a Mac you simply need to be signed into both the Mac and the iPad on the same account and connected to WiFi and Bluetooth; the wireless connection is seamless (under System Settings –> Displays –> Plus icon –> Mirror or extend to [your iPad’s name]). No cable is needed.
I’ve found the connection to the iPad as an additional screen to be just as snappy as a traditional screen connected via (USB-C or other) cables. The only downside is that the iPad screen is not as large, but it’s still plenty large enough to be useful next to my main screen.

• Video/music/podcast/reading source, especially on long rides
• A portable second screen for work (wirelessly connected to a laptop)
• Or: A laptop replacement (especially coupled with a portable keyboard)
• The same connecting and photography functions as a phone, but with a bigger screen
You’ll also need an iPad case (to protect it in travel) with some sort of a built-in stand. I’m using the Blosomeet Case, which is particularly protective. It has a tempered glass screen protector and a solid, wide case with a kickstand.
Using a tablet as a second screen is also possible with Windows / iPad combos as well as Android tablets. The connection is made with stand-alone software, but it is apparently much more of a hassle and reviews of such setups that I’ve read are not particularly enthusiastic. A USB connection is needed. If you’re on Windows or Chrome OS, I’d just opt for portable USB-C connected screens instead of trying to connect your tablet.
I switched to Mac recently for other reasons, but the ability to have the iPad double seamlessly as a second screen has been one of the biggest advantages of the switch.
Laptop Stand—Get Your Screen Height Correct for Good Posture

The recommended height for your screen is with the top of the screen flush with eye level. This helps you keep your neck and shoulders relaxed and keeps you feeling stronger and more active in whatever work you’re doing.
There are a couple of portable, adjustable height options that can do this. I’ve been using the Nexstand K2, which gets the screen easily up to the proper height and is adjustable and at a good price. It’s made from reinforced nylon and has lasted longer than a couple of my laptops. With this sort of design, your laptop is held firmly in place, even outside in windy environments like that pictured, on a coworking rooftop.
Our Favorite Lightweight, Portable Laptop Stand
The Nexstand K2 securely holds your laptop and the height is adjustable, so it works at any desk. For travel, it is light (238 g.) and folds down and slips into its own fabric sleeve.
If you want to raise your screen flush to eye level and don’t mind traveling with a separate keyboard (which should rest on the table), this is the way to do it.
It’s also quite reasonably priced, but our handsome readers get an additional discount at the link with the code “MINIMALIST”.


If you are fancier or more weight-obsessed than I, there is a slightly lighter carbon fiber version: The Nexstand K1. (And there is a Nexstand K7, but it doesn’t go up as high and so it’s unlikely to get your screen to eye level—I wouldn’t use it.)
Another good, very similar option to the Nexstand K2 is the Roost; it’s slightly lighter-weight but just as grippy and secure. Unfortunately, it costs significantly more. Were it not for the price, it would be our top pick because it’s ever-so-slightly lighter.

There are many other options on Amazon’s list of laptop stands and monitor stands, but generally those are either too heavy or don’t get a laptop up high enough to truly be useful for travel and work.
Ideally, you would have your second (and third) screen also at eye level, but I find that I tend to only look over at those screens as references while I mainly focus on the laptop screen. I don’t mind that I have to look down a bit for those and it’s not worth the bother of propping them up higher.
However, if you want a more expensive but very nice solution for mounting portable monitors at eye height while travelling, check out Tern monitors with tripod stands. Also know that we have published a review of Tern and compared that setup with the one in this article—I really enjoyed being able to elevate my second monitor as well.
The cheap solution: Wherever you go, rummage around your work space and stack up some books, find some boxes, etc. You can do this not just for your laptop but for all of your screens. I have done this in some situations and it works fine. However, on a beautiful day like the one pictured here, when I was motivated to get right to work, it was great not to have to mess with trying to find stuff at the right height to put under my laptop—which is sometimes a losing battle in any case. My laptop stand has been a good productivity investment for getting me immediately and comfortably to work in any environment.
Portable Keyboard with a Cover

If you’re going to work with your laptop’s screen elevated, you don’t want to raise your hands in the air to type on it. So you need something else to type on that rests separately on the table.
I’ve crammed various keyboards into my carry-on for years. The problem is, even the lightest, most portable keyboards rarely come with a proper travel case. And then they tend to get damaged in transit.
This is why I’ve finally switched to the Logitech Keys-to-Go 2, which is extremely lightweight and has a protective cover. It works great whether I’m using it to type out messages on a Mac, Windows, Chromebook, or just connected to my phone. And it’s easy to switch between three different connections.
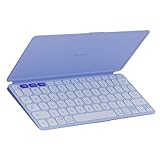
• Pair up to three Bluetooth devices: any Android/Apple phones and tablets as well as Windows, Chrome, and MacOS computers; you can reconfigure the keys as preferred
• Three-year battery life from changeable coin-cell batteries (pre-installed)
I was a bit hesitant to get this at first because of the claim of a “three-year” battery; what would happen after that? Fortunately, once I bought it, I realized that there are two replaceable coin cell batteries. These can be swapped out with a watch screwdriver when it’s time to do so. Coin cell batteries are quite cheap and it’s likely you’re using the same type of batteries for other home or travel electronics as well.
The disadvantage of the Logitech Keys-to-Go 2 compared to other keyboards that I’ve used is that it’s a bit small (25 cm long). However, I type quickly on it and feel comfortable doing so; the portability is worth it.
Mouse

I’m using a regular—not travel-oriented—wireless mouse at the moment: the very versatile Logitech M720. I love the scroll wheel that goes not just up and down but also tilts left and right. I’ve had it for years and it just gets thrown anywhere in my bag and hasn’t broken yet. I make sure the battery is fully recharged before hitting the road. If I’m on the road for many months I’ll take a charger or get a new one if needed: a single AA battery.
The Laptop
I’m on a 15-inch Macbook Air, which is great in terms of this setup for its ability to connect seamlessly and wirelessly with an iPad.
Previously I’ve loved travelling with a Chromebook; Chromebooks do far more than most non-Chromebook users would suppose and I really recommend them for travel as a sole computer. There were only one or two tasks per year where I’d have to grab someone else’s Windows or Mac to do some small thing. And, when I accidentally lost my Chromebook on a Treno train in Italy, I wasn’t too bummed out. Everything was automatically in the cloud already and so my loss was limited to that of a Chromebook—about a third of what a similarly useful Windows/Mac costs. Lose it in transit and you can replace it at the next destination and get right back to work.
Universal Travel Adapter with Multiple USB-C Outlets
Since all of my stuff (phone, iPad, laptop, headphones, toothbrush, etc.) uses USB, I can get by on a single charger for everything. We’ve reviewed how this is possible with a single universal (any-country) charger with multiple USB-A and USB-C outlets at a high power, like the one below.
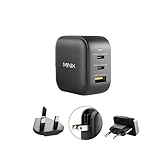
• Can plug into just about any wall in the world with 100-240 voltage and exchangeable USA/UK/EU plugs
• The smallest, most packable charger we’ve found with these features; slightly larger than the 33W version
• Ports: Two USB-C (supporting Power Delivery 3.0) and one USB-A (supporting Quick Charge 3.0)
Water Bottle
At the moment I’m using an all-glass water bottle, which is more elegant albeit bulkier than foldable silicone water bottles.

• So well-engineered that a guarantee is offered to replace it if it drops and breaks
• The 22 oz. / 650 mL size is 3.15 in. / 8 cm diameter and generally fits well in backpack sleeves (slides in and out well) and cup holders
A Bag to Put it All in


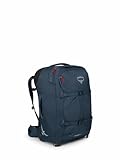
The entire setup is compact enough that it even fits in a sling. I’ve reviewed the Osprey Nebula Sling, which I can use to carry this entire setup to a coworking space over one shoulder, with lots of room to spare.

• Main pocket zips around to open out completely flat
• Outer water bottle pocket and front panel organization pockets
• Straps can be set for carry over either side
• Well-built, lightweight, and with a lifetime warranty
Questions, comments, and advice that I’ve missed? Drop a note in the comments to help other readers and to help me update this post as I go.






So I’m looking for a backpack style sling that will fit my 15.6 inch Dell work computer. From your review it has similar dimensions as your portable monitor. Did you just slide that in the main compartment? I’m assuming it was a little too long for the laptop compartment, but still fit within the overall dimensions of the bag.
Hi Chris, the Nebula sling I mentioned above will absolutely work for a large laptop like this in the dedicated laptop sleeve (leaving the other compartments free for other stuff). Check the full review: https://minimalist.travel/packing/travel-accessories/osprey-nebula-sling-reviewed/